Frequently Asked Questions

Some of the most queries questions on our products are answered below;

A Smarter Way to Build: The Advantages of SHS Cleats from www.shscleats.com.au

In the world of construction, time is money — and precision is everything. That’s why builders across Australia are turning to a smarter, more flexible solution for assembling SHS posts, cleats, and baseplates: SHS cleats from www.shscleats.com.au.

Traditional Method vs. SHS Cleats: What’s the Difference?

In conventional construction practices, cleats and baseplates are typically welded to SHS posts in a factory, forming long, rigid assemblies that are then transported to the site. These welded SHS posts — often up to 4 metres long — are heavy, cumbersome, and difficult to handle. Once on site, positioning them accurately both horizontally and vertically can become a logistical headache, especially when minor adjustments are needed due to changes in beam levels or site conditions.

This is where SHS cleats shine.

The SHS Cleats Advantage

At SHS Cleats, we’ve designed a system that gives builders greater flexibility, control, and efficiency. Instead of pre-welding everything in the factory, our system allows builders to assemble the SHS posts, cleats, and baseplates directly on site — no welding required.

Here’s how our SHS cleats make the difference:

  • Simple On-Site Assembly

    SHS cleats slide directly onto the SHS posts and can be securely fastened in place. No special tools or welding equipment needed — just straightforward mechanical assembly.

  • Adjustable Beam Levels

    One of the biggest challenges on site is dealing with unexpected level changes. Our SHS cleats can be easily adjusted up or down the post, allowing for fast and accurate alignment to suit real-time beam height requirements.

  • Greater Accuracy

    Because adjustments can be made on site, the builder has complete control over post and cleat positioning. This ensures a more precise fit for beams and structures, reducing rework and increasing build quality.

  • Time & Cost Savings

    Avoiding factory welding means less lead time and lower transport costs (no more 4m welded assemblies). It also means fewer delays and a faster overall build time — a clear win for builders and developers alike.

  • Builder Empowerment

    The control is now in the hands of the builder. You no longer have to rely on factory-fixed cleat positions. If something needs to change, you slide the cleat, secure it, and move on.

A Practical Solution for Real-World Challenges

SHS cleats from www.shscleats.com.au provide a practical, flexible alternative to traditional welded systems. They’re ideal for projects where precision, adaptability, and speed are essential — and they make life significantly easier for builders working in unpredictable site conditions.

Whether you’re managing a small structural installation or a large-scale commercial build, our SHS cleats offer the speed, accuracy, and control you need to get the job done right — the first time.

Yes, when ordering please specify the depth and width and material of all your attaching beams, ie, timber – 190×42 LVL15 or steel PFC-150PFC

For strength ratings a 5mm CFW is the strongest, followed by 2-m16 bolts , followed by 6 or more 12gx38 series 500 metal teks. For aesthetics ratings, welding looks best, followed by the teks then bolting.

When welding just CFW or stitch weld 40-40-40 down the 2 vertical edges of the channel to the post with a 5mm CFW, then use a sealant along the top edge to stop water entering the channel and post from the top.

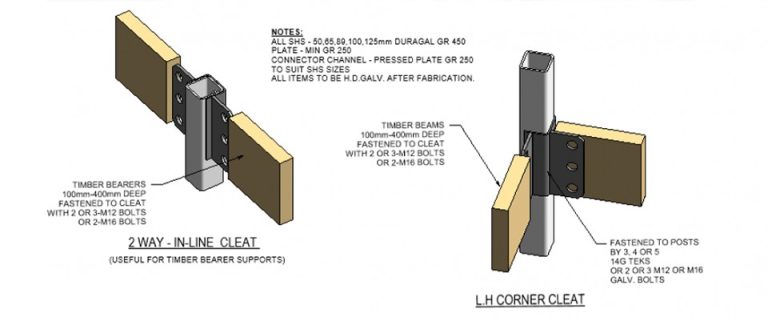
Generally  a min. 5-8 teks per channel leg that beams are attached to. for eg, a corner cleat will have 2 beams, so attach 5-8 teks on each channel leg on both sides of the SHS.

N.B all cleats require teks in the 2 shorter channel legs as marked at 30mm centres. If you are using the 3 way intermediate cleat you need tek screws in each of the 3 channel sides. If you are only using teks your structural engineer or SHS cleats engineer should confirm the minimum number of teks to use based on the shear load of the connecting beam but generally 5-8 teks minimum each face, allow for 3kN allowable shear load per tek screw, however it depends on the calculated shear force on that joint which is based on beam length and load width.

Our SHS cleats engineer can confirm your connection with you if you provide your structural and architectural pdfs for our review to info@shscleats.com.au

Using a combinations of tek and a fillet weld is usually the best and strongest connection. Using the teks to hold the cleat in place and attach the beams followed by using a 5mm CFW down the 2 vertical edges of the sliding C channel to the post works best, Or simply weld the channel to the post with no cleats.

Yes, just paint directly over the galvanised surface.

Certainly, either CFW ot stitch weld 40-40-40 welding is the strongest and better looking.

Use 12g-38 series 500 metal galvanised teks, this is a must, otherwise the tek heads just break off when tightening.

Yes you can, simply fasten the sliding channel to the post with 2 or 3 m12 or 2 off m16 galvanised hex.hd bolt nut & washers instead of using tek screws if you want a stronger shear load connection, just use very second marking at 70mm crs and drill the holes at 14mm or 18mm dia for the m12 or m16 bolts. Bolting can be done more easily on 89 shs and above due to the extra channel flange width available.

Yes we supply shims / (2mm,4mm & 6mm thick shims for levelling) the same size as your SHS post size, so place the shims under the top plate cleat and on top of the post and this will lessen the shear load on the tek screws or bolts fastening the sliding channel to the shs post.

Yes certainly simply chemset 2 shs posts with an shs base plate to the concrete floor and fasten the steel angle bracing cleats (via tek, bolt, weld or tek and weld) to both of the shs posts each side of the frame, then bolt your steel angle brace to each of your cleats.

Yes, simply fasten the relevant bracing rod cleat to the shs post at the levels required, then install your threaded rod and clevis and bolt your clevis’ to the shs bracing rod cleat, then tension your threaded rod with your turnbuckle, or use our bracing rod ring connector 100mm wide x12mm thk x 250mm dia galv. steel ring and bolt your bracing rod through the steel ring with a spherical washer and nut.

Yes our new e-commerce website has just been launched where you can order and pay for your cleats directly on our website, simply go to the shop webpage, select the type of cleat you require , answer the relevant questions re: the beam and shs post sizes as well as the quantity for each cleat. Then submit your order and pay online, and your cleats will be delivered to your nominated delivery address. Or simply email or message SHS Cleats from the request a quote page with your structural pdfs for advice on which cleat type you need for your project and our engineers will confirm the best cleat type and fastening method for you.